Points of Interest Mark-Up in Takeoff: Flag Every Issue Before You Quote
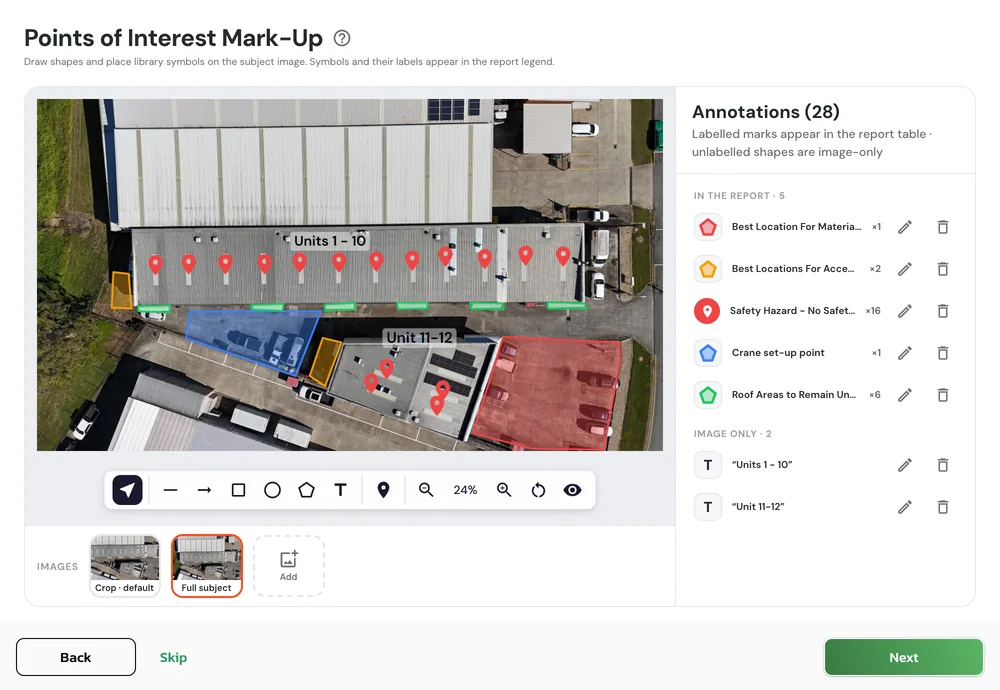
Mark access points, hazards, plant and storage areas, and elevations on your overview image. Every mark creates an easy-to-read key in your Takeoff report.

Measurements Are Only Half the Job
A Takeoff report tells you how much roof there is: areas, lengths, pitch and accessories, ready to quote. What it couldn't show was everything else you know about the site.
Where to access the roof. Which areas are non-trafficable. Where the crane sets up, and where the sheets get dropped.
That knowledge is usually passed on through written or verbal instructions. Points of Interest Mark-Up puts it on the overview image, giving your crew a clear visual that no set of instructions can match.
Mark it once, and the client, the supervisor and the crew all see the same plan.
What to mark
Six Things Worth Marking on Every Job
Points of Interest Mark-Up comes straight after Accessory Detection, where ARIS automatically identifies roof features like vents, skylights, flues and solar panels. Work on the overview image already in the job, whether from a drone flight or satellite imagery, or add another with the + tile. Then mark up what your crew and client need to know.
 Polygon
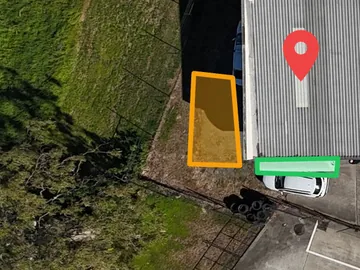
Access points
Outline where the access tower or ladder goes up, so the crew knows exactly where to get on the roof before they arrive.
 Symbol
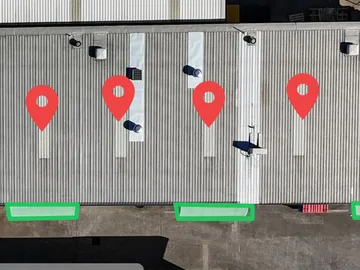
Safety hazards
Flag skylights with no safety mesh, fragile sheeting, aerials and power lines. Nobody should find a hazard by standing on it.
 Polygon
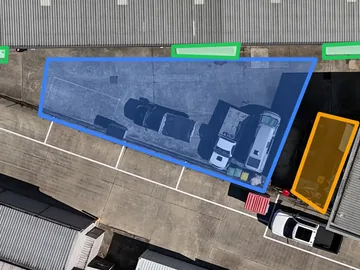
Plant operation
Show where the crane truck, scissor lift or EWP sets up, clear of trees, overhead lines and the neighbour's car.
 Polygon
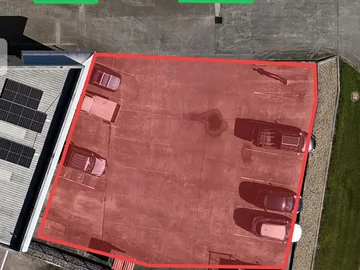
Material and plant storage
Choose where the sheets, skip bin and gear will go, so deliveries land in the right place the first time.
 Polygon
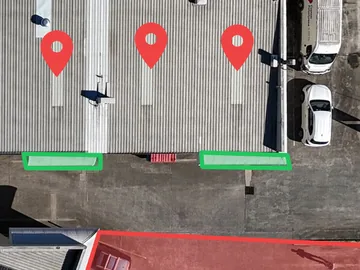
Areas to remain untouched
Outline the roof sections that stay as they are, so nobody works on or quotes for them by mistake.
 Text
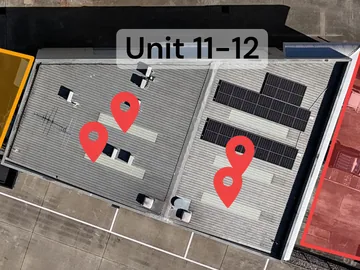
Building labels
Name each building with a text note, like Unit 11-12, so everyone knows which roof is which.
How it works
Pick a Tool, Label It, Mark It Up
Everything happens on the image, with a floating toolbar along the bottom of the canvas.
- SelectMove, restyle or delete a mark
- LineStraight runs and edges
- ArrowRoutes and directions
- SquareZones and work areas
- CircleRound features and spot areas
- PolygonAny outline, point by point
- TextNotes on the image
- SymbolMarkers from your library
- 01
Pick an image
Choose an image from the strip under the canvas: the cropped overview, the full overview, or anything you add with the + tile.
- 02
Choose a tool
Line, arrow, square, circle and polygon draw shapes. Text adds a note. Symbol drops a marker from your library.
- 03
Label it first
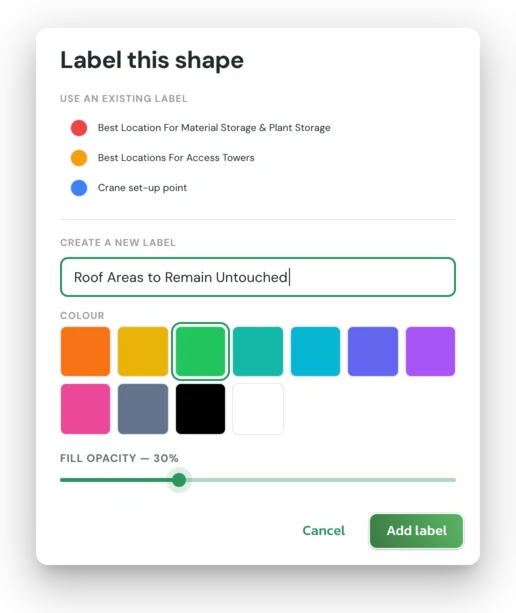
Pick a shape tool and ARIS asks for a label before you draw. Reuse one, or name a new one and choose its colour and fill.
- 04
Mark it up
Drag to draw lines, arrows, squares and circles. For a polygon, click point by point, then click the first point to close it. The tool stays armed, so you can keep marking.
- 05
Check the tally
Labelled marks are grouped in the sidebar under In the report, with a running count for each label.
- 06
Edit or remove
Select a mark to move, restyle or delete it. Rename or recolour a label and every mark using it updates.
Good to know
Text notes stay on the image. Use them for instructions like “Fragile: no foot traffic”. Only labelled marks add a row to the table in the report.
Your symbol library
Build a Library Your Whole Team Uses
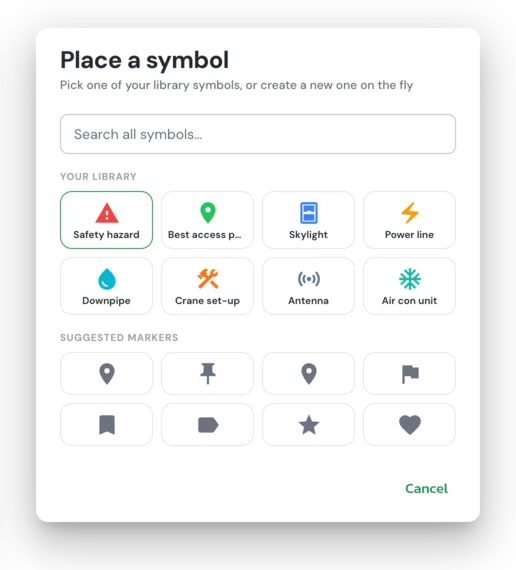
Symbols come from a library shared across your organisation. Each one is an icon, a colour and a label, and the same icon can mean different things in different colours: a red pin for one thing, a blue pin for another.
Set up your common markers once under Settings, Symbol Library. On a job, pick from your library or create a symbol on the fly. Choose Save to library & add to keep it for next time, or Add to use it on that job only.
An armed symbol stamps on every click, so marking three hazards takes three clicks. Each icon and colour keeps one meaning across the job, so the report never shows the same marker meaning two things.
Editing a library symbol later won't change marks already placed on past jobs.
In your report
A Points of Interest Page in Your Takeoff Report
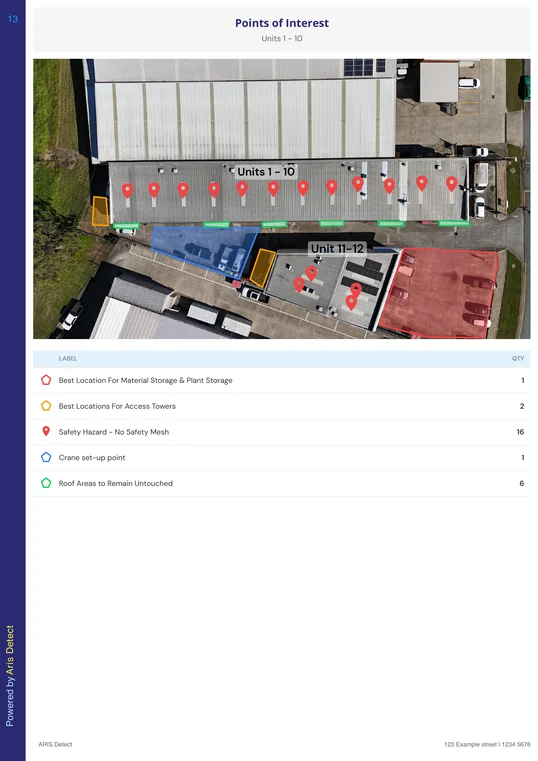
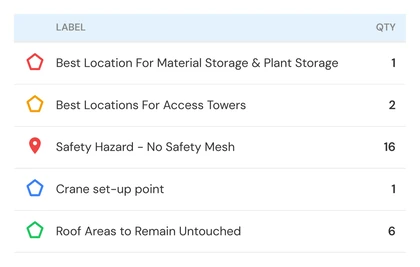
Generate the standard Takeoff report and your mark-up appears in a Points of Interest section, straight after the Accessory Counter. Each marked-up image gets its own page, headed with the structure name.
Below the image, a table lists every labelled mark with its symbol or colour and a count. Symbol labels live in that table rather than on the photo, so the image stays clean.
The section sits just before Site Access Notes, so your written access instructions and the marked-up image read together.
The step is optional. Skip it and the report is unchanged: no marks, no extra page.
Standard Takeoff report, in order
- 1Cover Page
- 2Measurement Summary
- 3Forms
- 4Accessory Counter
- 5Points of InterestNew
- 6Site Access Notes
- 7Scope of Works
- 8Takeoff Diagrams
- 9Terms and Conditions
Running a customised report template? Ask our team to add the Points of Interest section to it.
Why it matters
Safer Starts and Clearer Quotes
For roofers quoting work
Show the client which sections you're replacing and how the job will run. A marked-up image explains a partial replacement faster than a paragraph.
For supervisors and crews
Brief the crew before they leave the yard: where to get on, what to avoid and where the crane goes. Fewer surprises on arrival.
For insurance builders
Back up a scope with damaged areas and access constraints marked on the image, in the same report as the measurements.
Points of Interest Mark-Up supports your safety planning. It doesn't replace your SWMS or site risk assessment.
The measurements tell you how much roof there is. The mark-up tells everyone how the job will run.
Common Questions
- Do I have to use Points of Interest Mark-Up?
- No. The step is optional. Skip it and your Takeoff report has no Points of Interest page.
- Can I mark up more than one image?
- Yes. Mark up the cropped overview, the full overview image, or extra images you add with the + tile. Each image with marks gets its own page in the report.
- Can I use satellite imagery?
- Yes. Mark up whatever overview image is in the job, whether it came from a drone flight or satellite imagery, or upload another image with the + tile.
- Is it the same tool as in Roof iQ?
- Yes. Points of Interest Mark-Up started in Roof iQ and works the same way in Takeoff, with the same symbol library shared across your organisation.
See it in action
Built into Takeoff, ready for your next job
Subscribers will find Points of Interest Mark-Up under Upload Images, straight after Accessory Detection.
Not a subscriber yet? Book a 20-minute demo and we'll mark up a real job with you, from overview image to finished report.
Our Articles
Introducing Roof Takeoff Reports in ARIS Detect
A new semi-automated measurement tool that turns drone or satellite imagery into accurate, ready-to-quote roof reports in minutes.
Read article →
Drone Roof Inspection Guide
Step-by-step guide to capturing roof inspection photos with a drone, from drone choice and CASA rules to the full-subject overview shot.
Read the guide →
Every Way to Share an ARIS Detect Report, Without Losing Quality
Full quality, compressed and Client Report Pack options, so every report gets through email and insurer portal limits.
Read article →